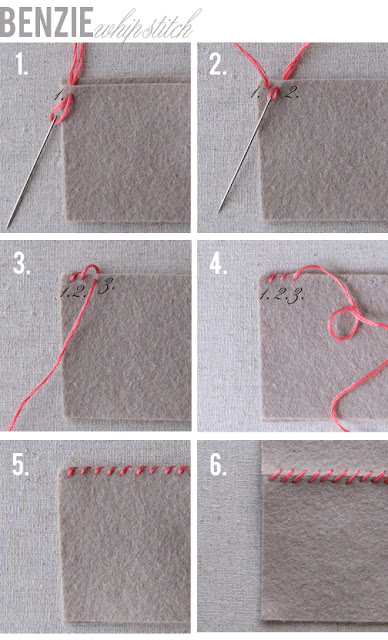
1. To begin, place your needle and knotted thread in between the two pieces of fabric (felt is used here because it doesn't fray) and up through the top layer of felt at point one.
2. Take your needle behind both layers of felt and sew through at point two. You will notice that the needle is at an angle, this gives the stitches the diagonal slant.3. Again bring your needle behind both layers of felt and sew through at point three.
4. & 5. Continue stitching until finished aiming for consistency in spacing and length of stitches.
6. You can also use the whip stitch to attach pieces side by side -just flatten the felt when done. It's like a stitch trick!
And here is a handy diagram:
Here we start at the right side of the fabric and move to the left. Constantly whipping the needle at an angle up from the front the the back. Up from one and back around through two.
The second way to use the whip stitch is when attaching an applique or a shape to a piece of clothing or artwork. All the stitches are the same -but the angle of the needle is straight up and down. Here you will notice a piece of felt (my applique) on a linen backdrop.
1. Bring your needle and thread behind your applique and background and up at point one.
2. Go back down at point two right where your applique meets the background. You'll want to keep your needle nice and straight.
3. Come back up at point three.
4. Go back down at point 4.
5. Remember to keep your stitches evenly spaced -this will make for a beautiful applique!
6. Keep on going, practice makes perfect!
Again we start at the left and move to the right (but you can do what works for your project) coming up at one and back down at 2. This is one of my favorite stitches -it makes my projects come together quickly!
More embroidery basics by Benzie:
Backstich


