Friday, December 13, 2013

Monogram Christmas Ornaments // Cropadile Giveaway!

In December, my kids clamor to put up the Christmas tree ornaments -but what makes it even more special is when they have ornaments that are just for them -a ballerina for the dancer, a chess piece for the gamer and a glittery dinosaur for the preschooler. Monogramed ornaments also serve as name markers for presents or place settings at holiday dinners -something that can be taken home as their own. 

letter felt monograms

wool felt tutorial

For these ornaments you will need:
Wool Blend Felt -we used Swan, Peacock, Mustard, Ochre, Magenta and Flamingo. 
Eyelets (we used 3/16" eyelets)
Parchment paper
Scissors 
Thread
Pencil

1. First, take 2 sheets of felt. To make it easy, I just folded a 6x9" sheet in half. Then trace the letter onto parchment paper. You can download the Futura font and numbers here. Lightly iron your parchment to your choice of felt. Check out our parchment technique for more info.

2. Then stitch right on top of the paper -you're joining the two sheets of felt together. I used a machine to do this, but it would work by hand as well! I love how easy it is to stitch a pattern this way!

3. Carefully rip away the parchment and cut around the letter. You'll want a sharp scissors for this! 

how to cropadile chart

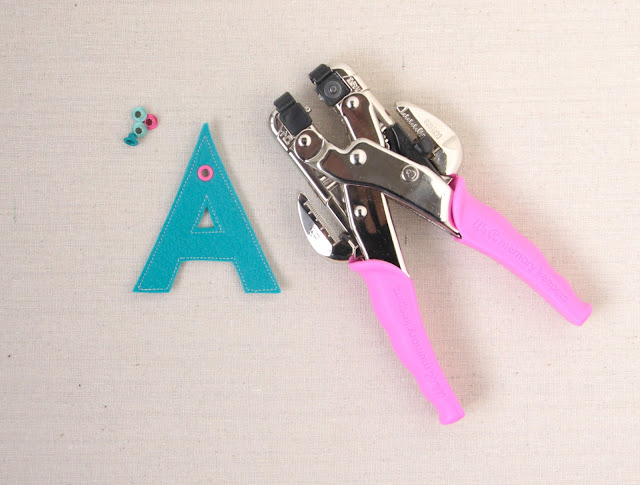
Okay, now the next step is setting the eyelet -but before I can do that -I have got to tell you about a fun tool that will make adding eyelets much easier and quicker! It's the Crop-a-dile! First, I'll give you a quick tour:

1. Squeeze the handle and press the lock button -this will unlock the setter or lock it for compact storage.

2. The Crop-a-dile has two hole punches in 1/8" and 3/16" size (if you're looking at the photo -there is one punch at the top and one at the bottom). This preps the material (in our case, felt) to hold the eyelet. You may notice a little black knob -this is adjustable so you can evenly space multiple holes along a line.

3. This is where you actually set the eyelet - but first the combo has to be right for whatever item you are setting (the right size eyelet, snap or embellishment). This is done by popping out the little black cubes and twisting them to the setting you need. Pop it back in when you are done -and set your eyelet by placing the item between the cubes (make sure the 'base' is on the bottom -it's written on the crop-a-dile) and squeezing the handle. Works perfect every time! You can also view a video to see the tool in action.

4. Here is a handy combination chart -the top cube is designated by a letter and the bottom by a number. We are using 3/16" eyelets -so we have our Crop-a-dile set at A-1. Now back to the ornaments!

eyelet setterTo set the eyelet, make a mark where you want the eyelet to be.

how to set eyelets with cropadileWe are using 3/16" eyelets (this is the measurement of the center hole). Use the 3/16" punch on your Crop-a-dile.
how to set eyelets with cropadile


Adjust the knobs on your Crop-a-dile to A-1, place your eyelet in the hole and press. String some ribbon (we love velvet!) and you have an ornament!

letter felt pattern
I love how just adding eyelets give these ornaments so much class -definitely on my list of favorite felt tools!. We R Memory Keeps has offered to give a Crop-a-dile away to one of Benzie's guests. Just add a comment below! For two additional entries, like Benzie and We R Memory Keepers on facebook. Congratulations Laura Cox!

To get 20% off eyelets, ribbon or the Crop-a-dile (or other Memory Keeper and Lifestyle products) use BENZIE at www.shopwer.com.


Monday, November 18, 2013

Guest Curator: Kitschy Christmas by Wild Olive

This guest collection was planned just in time to deck your halls -and trim your tree! Mollie Johanson from Wild Olive introduces a pattern for nine different ornaments -in some retro pinks and greens.

benzie felt reindeer kitschy ornament
wild olive felt poinsettia kitschy ornament benzie
Oh my! The poinsettia ornament -I think it's my favorite -but you'll have to check out the rest! All cute and smiley! The pdf pattern is super easy to understand and she has some helpful tips about embroidery on felt. This pattern is for sale in her shop and Kitschy Digitals. I love how it's easy to just do one ornament -or a few and so easy to take along on holiday trips!


This is Benzie's first guest curated collection that also has coordinating floss, I'm excited about how easy it is to get supplies and get crafting. Pick up your floss and felt at the same time!

kitschy christmas felt and embroidery floss

Friday, October 11, 2013

Our Favorite Felt Tip and Chicka Boom Boom Cupcakes

Read our updated blog and shop here!

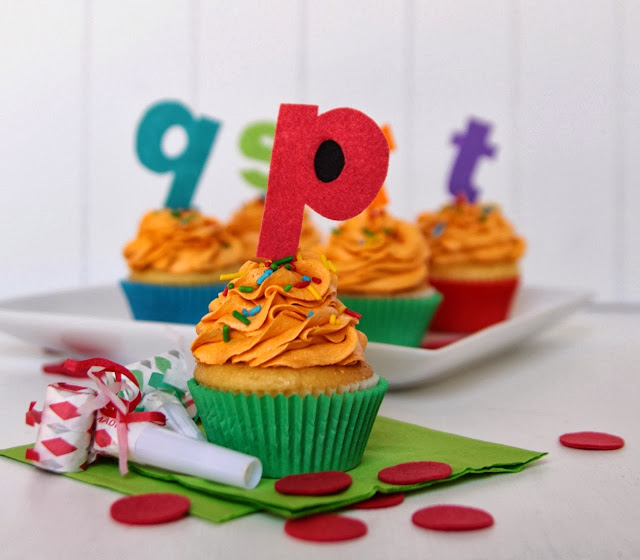
Our foster son recently had a birthday -and we celebrated with cupcakes and his favorite book: Chicka Chicka Boom Boom  -this boy recites the book perfectly from cover to cover and even requests to sleep with it!

Look who's coming?!

chicka boom cupcake toppers
It's black-eyed pea!

You'll need: wool blend felt, chicka font sized to 209, scissors, toothpicks, glue... and our secret weapon: Super Spray!

chicka chicka cupcake diay

1. Fist cut out letters of your choosing (black eyed p is a favorite here!). We like to transfer our patterns using freezer paper -and even have a tutorial for you!

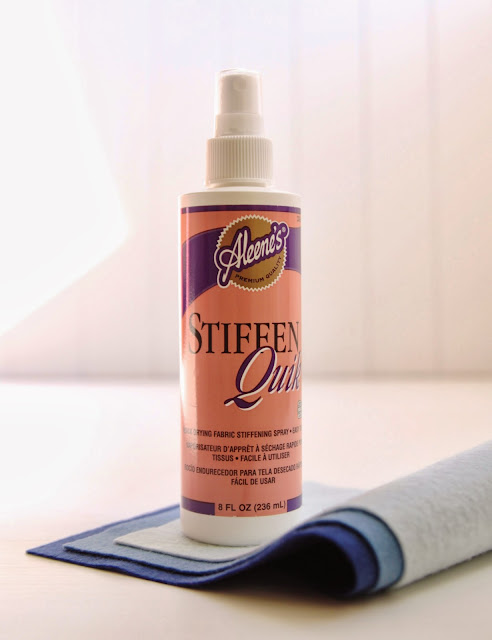
2. I'm excited about this step fellow crafters -it's like introducing felt's best friend -or a secret beauty tip -and it's so easy too! Drum, dum dummmm... Fabric stiffener! It helps felt to stay sturdy, keep its form and provide extra durability; it extends the capabilities of felt even further. Here we are using a spray product called Stiffen Quick that we found at a local fabric store (but I just call it Super Spray).

spray stiffener

I generally place the items to be sprayed in a box (to protect the surrounding area) -and spray stiffener about 6-8 inches away from the felt. You control how stiff you want your felt by how much you spray. These cupcake toppers needed to be pretty stiff so I sprayed one side till wet, came back an hour later flipped the letters and sprayed the backs.

felt stiffener hard cupcake toppers

After the letters dried -I used thin line of hot glue to attach toothpicks. Then you're done and ready to party!

felt letter toopers diy


Tuesday, October 8, 2013

Garlands for Sale!

We recently updated the way we assemble and produce our multi-sized circle garlands. But we still have some of Benzie's first design in stock -these are incredibly long at 7 or 14 yards (21 or 42 feet) per garland. No more skimpy party decorations -and we are offering them at a crazy 50% off our regular price! Go visit our shop!


Tuesday, September 3, 2013

Benzie in Pregnancy & Newborn!

Benzie's first magazine feature is in September's issue of Pregnancy & Newborn magazine! Do you spy our Moss green garland? Surrounded by Divine Twine, Shop Sweet Lulu's straws, Lisa Leonard's cake toppers and Rifle gift wrap... we're in good company!

benzie, garland, press, magazine, pregnancy and newborn

Magazines are available in newsstands now! Thanks Pregnancy & Newborn! 

Tuesday, July 16, 2013

Butterfly Garlands

Butterfly garlands are now available in the handmade shop -and felt-fetti to match! Even better -you pick the color to match your party!
Felt-fetti is also perfect for making your own garlands -available in our supplies shop. We like to call it flutter-fetti. Ha!

Tuesday, June 18, 2013

MmmCrafts, Guest Currator

She's been to Benzie before -and we again welcome Larissa Holland from MmmCrafts -this time to celebrate the creation of her newest pattern of her beloved needle books. These gorgeous little books -so well made and intricately designed and now available as a pattern with instructions -and all of Larissa's tips and tricks are included! And I can't wait to make one for myself!

Even better -this collection of felt has been created by Larissa to coordinate with her original needle book color scheme. Just perfect! And don't forget -Benzie even has floss to match!

Purchase the needle book pattern in the MmmCrafts shop. And visit Larissa's blog. And don't forget your felt! Happy Stitching!

Wednesday, June 12, 2013

Felt like a Hexagon

Have you seen Benzie's newest felt-fetti? It's gone geometric! Oversized hexagons measure 1" per side or about 2" wide and is available in our felt shop -they are great to embroider on. Mollie from Wild Olive made a fabulous coaster for her lemonade pitcher, a diy too. It turned out great!
hexagon felt shapes
And a geometric garland had to be made! Available in our handmade shop
hexagon felt garland
Happy Hexagons to you!


Monday, May 20, 2013

Embroidery Basics: Whip Stitch

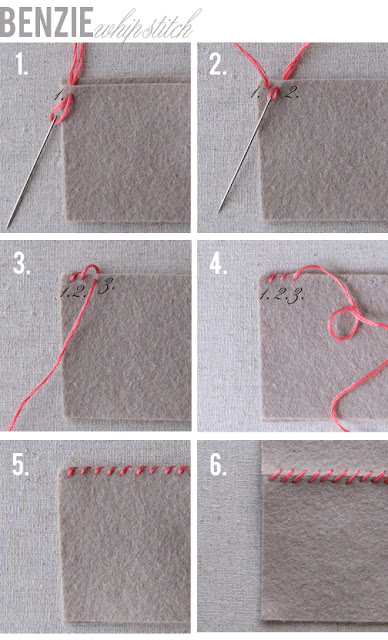
The whip stitch is one of the easiest stitch to learn and the most common first step for beginners -even kids can pick up on this one! There are two ways to use the whip stitch. The first one described is used to connect two layers of fabric -like when making a small pillow or softie. Here are the step-by-step instructions:
whipstitch embroidery tutorial
1. To begin, place your needle and knotted thread in between the two pieces of fabric (felt is used here because it doesn't fray) and up through the top layer of felt at point one. 
2. Take your needle behind both layers of felt and sew through at point two. You will notice that the needle is at an angle, this gives the stitches the diagonal slant.
3. Again bring your needle behind both layers of felt and sew through at point three.
4. & 5. Continue stitching until finished aiming for consistency in spacing and length of stitches.
6. You can also use the whip stitch to attach pieces side by side -just flatten the felt when done. It's like a stitch trick!

And here is a handy diagram:
whipstitch embroidery tutorial
Here we start at the right side of the fabric and move to the left. Constantly whipping the needle at an angle up from the front the the back. Up from one and back around through two.

The second way to use the whip stitch is when attaching an applique or a shape to a piece of clothing or artwork. All the stitches are the same -but the angle of the needle is straight up and down. Here you will notice a piece of felt (my applique) on a linen backdrop.
whipstitch embroidery tutorial
1. Bring your needle and thread behind your applique and background and up at point one.
2. Go back down at point two right where your applique meets the background. You'll want to keep your needle nice and straight.
3. Come back up at point three.
4. Go back down at point 4.
5. Remember to keep your stitches evenly spaced -this will make for a beautiful applique!
6. Keep on going, practice makes perfect!
whipstitch applique embroidery tutorial
Again we start at the left and move to the right (but you can do what works for your project) coming up at one and back down at 2. This is one of my favorite stitches -it makes my projects come together quickly!

More embroidery basics by Benzie: 
Backstich


Friday, May 17, 2013

Embroidery Floss

Felt and Floss
What's that you say? Felt... and embroidery floss? Yes! Benzie now has the most recommended floss in the world -DMC and in every color of our Benzie rainbow. We have searched and scoured for the best hue to coordinate with our shades of wool blend felt making stitching and embroidery projects come together seamlessly.

Rainbow Embroidery Floss from Benzie

Garden Embroidery Floss from Benzie
Our felt collections are a favorite and now there are floss groups to match. These two are my favorite but there are more in the shop. You can also choose floss by its DMC number or by our felt color (it's a whole lot easier to say a name, don't you think?). There may be some hue and shade difference between felt and floss -but you'll find that it coordinates quite well. Welcome to Benzie's newest rainbow!


Tuesday, May 14, 2013

How to cut felt


How to Cut Felt

Update -Benzie is now blogging over at Benzie Design - don't miss any crafty news and tutorials!


It's really quite easy to cut shapes and patterns out of felt -much more precise than pinning, far less fuzzy then transfer pens and cleaner than chalk! And this is by far the most fun! The key is freezer paper (which can be purchased in a roll at your super market or in sheets at your craft store) and a sharp scissors.

This is what you'll need:
-freezer paper
-pattern
-felt
-iron
-pencil
-scissors


1. First trace your pattern onto the matte side of the freezer paper.


2. Iron your freezer paper (wax side down) to your felt. The wax helps to adhere the paper to the felt.

3. Cut out your shapes. I find small scissors helpful when maneuvering around tight corners and sharp tips lend itself to clean and precise cuts.


Cutting Shapes out of Felt

4. Peel paper off. If you find the paper difficult to peel away from the felt -ease up on the heat or reverse the pattern when tracing. You can also reuse your freezer paper -just re-iron and cut. Perfect!

Monday, May 6, 2013

Guest Curator: Noia Land

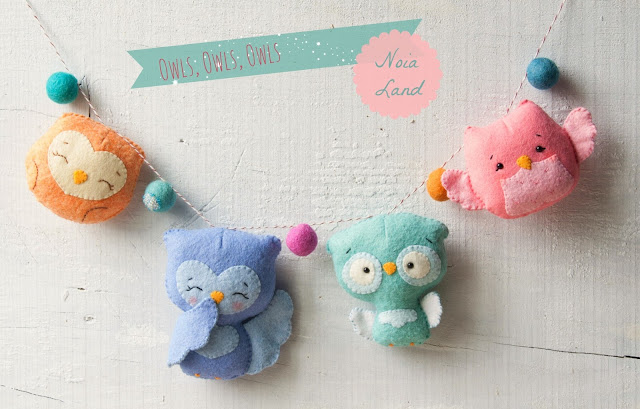
Noia Land Felt PatternI am so excited to introduce you to Paloma Rocha -pattern designer and creative behind Noia Land. Have you ever seen more adorable creatures? Long legged beauties, woodland friends, garlands -and even brooch patterns! (I'm a total sucker for anything I can pin on my blouse.) And what about Marie Antoinette? Beautiful! 
Noia Land Felt Pattern
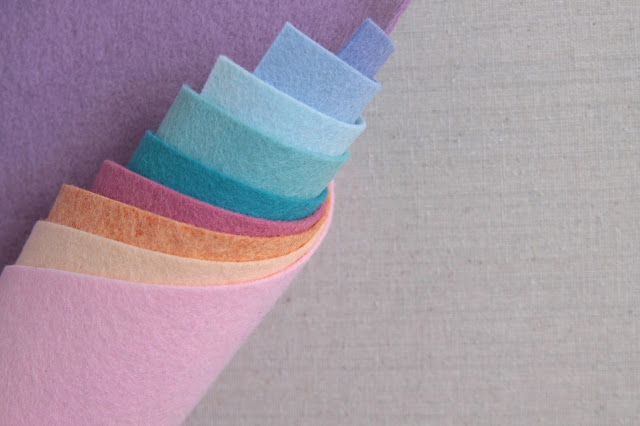
Noia Land has also included an extra special bonus for anyone who purchases her felt collection -a free pdf to make this adorable owl garland! All her patterns uses well designed graphics to help you sew your own doll or animal -and you can use Benzie's felt to get started. Noia Land chose these soft colors of Lilac, Periwinkle, Sky, Icicle, Swan, Peacock, Rose, Cantaloupe, Peach and Pink.
Noia Land Felt

Noia Land Felt
All of these patterns are available for download in Noia Land's shop. Noia Land's curated collection is available at Benzie.

Tuesday, April 30, 2013

Printable Number Bingo

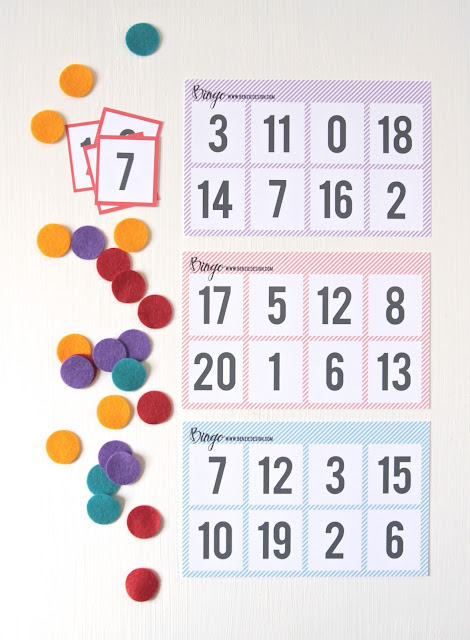
Any game that involves felt-fetti must be a good one -and pair that with some numbers and you and the kids have got a little math party!

Printable Bingo Game


This number bingo works your little one's brain; the preprinted cards include numbers 0-20. Or want to narrow it down to the tricky ones? We also included blank bingo sheets -we suggest laminating them and using a dry erase marker to fill in the blanks. The playing cards span number 0-31. How's that for smart? Here's your felt-fetti and here is your printable pdf -just print off on card stock, trim and play!

Bingo for Kids

Monday, March 4, 2013

Benzie Felt Scrap Bags

Felt Scraps by Benzie
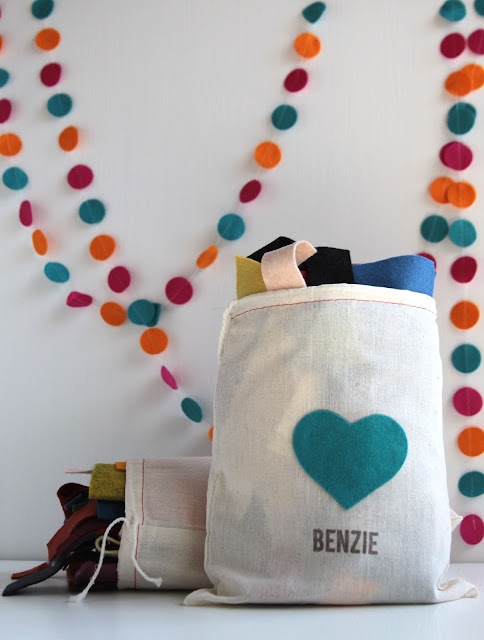
You asked for you -and now we have it! Bags of scraps! These remnants are a perfect way to try out Benzie's felt on a budget or to use for your craft experiments. Our scraps come from bolt ends, seconds or leftovers from our crafternoons.

Felt Scraps by Benzie

Wool felt scraps


Each bundle weighs 8 ounces and comes in a cute muslin bag overflowing with remnants. These scraps come in a variety of colors -all in Benzie's felt rainbow. You can find yours in the felt shop.

Wednesday, February 27, 2013

We're celebrating!

felt sale
We're celebrating our 3rd anniversary -and want to thank you for being a part of Benzie. You are all so very talented and creative -making Benzie's felt look it's finest. We wouldn't be the same without you and want to say thanks. For one week (until March 5) -use the code FELTLIKEAPARTY3 to get 10% off your order at our felt shop. And as always -happy crafting to you!


Saturday, January 5, 2013

Felt like a tutorial: Babushkas, Nesting Dolls & Matryoshkas

russian doll diy
These Russian dolls come by lots of names -and cute ideas plenty! For more nesting dolls tutorials visit Benzie's Pinterest.

1. Russian Doll Cushions by HobbyCraft.
2. An ornament by Better Homes & Gardens
3. Fabric nesting dolls by Made by Joel.
4. Babushka pencil toppers by One Crafty Mumma.
5. Soft doll tutorial by Cupcake Cutie.
6. Russian doll pillow and the legend of Babushka (is this for real?!!) by Restless Risa.
 
09 10 11 12
Blogging tips